Metal Clay Tips & Tricks
Metal Clay Tips and Tricks
Clay Hydrator

Every metal clay artist has gone back into an old opened package and found their leftover clay too dry to work with. Having a Clay Hydrator eliminates this issue and can save you hundreds of dollars in lost clay. Make sure you have one for each type of clay.
Rolling Out Clay Thickness

Clay Rolling Frames helps roll metal clay to a precise thicknesses. This is necessary for a consistent, even piece. Each Rolling Frame is numbered to correspond to the number of cards in thickness each represents.
Clean Cuts with Tissue Blades

Very carefully apply a bit of Slik, Claymate, oil or balm to tissue blade cutting edges before use for clean cuts that do not stick to metal clay.
Comfortable Working Positions

Always work on a surface that can be moved or rotated as needed to avoid putting yourself in a situation where you are uncomfortable or unsteady. This is especially important when using syringe. Move the work, not your body. Try to always maintain a comfortable position to have the best control. We offer Clay Boards created to provide smooth surfaces that metal clay will not stick to. This tool features non-stick Teflon surface and non-skid feet.
Paint Brush Tips

Always use top quality brushes. Inexpensive brushes will give you headaches and ruin your work with bristles that fall out and wreck whatever you are working on.
When using paint brushes to apply paste, always wet the brush before using. A dry brush will wick moisture away from the paste and encourage it to dry out. As the brush is used again and again dried paste will begin to build up near the ferrule (the metal part of the brush). This will cause the bristles to stick out and the blush fluff up and render it useless. By first wetting the brush, the paste stays moist and away from the ferrule.
Never dip the brush completely in the paste. The paste should not be more than half way up the bristles. This will help in keeping the brush in excellent condition.
Drilling Clean Holes
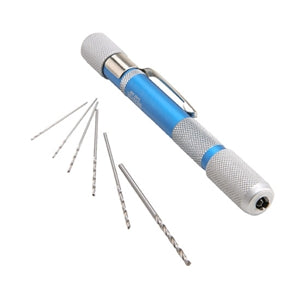
For the most professional look to your work, pay attention to the details, such as drilling. For perfectly sized, clean holes, drill after the clay has dried. Use a ball burnisher to mark the spot for your hole when the clay is wet, then use the correct sized drill to make a perfectly clean hole in the dry clay. You can also wait until the clay is dry and mark the spot for your hole with a sharpie.
After each working session, clean all paint brushes completely. Use a small container with just a bit of water in it. Vigorously mash the bristles to the bottom of the container for several seconds. This will clean all the metal clay particles out of the bristles. Reform the bristles back into shape for drying.
Using Porous Textures

Metal clay should never be textured with porous materials such as wood, paper, shells or anything else that absorbs moisture. The clay will stick terribly and you'll lose valuable clay in the process. Porous materials can be used however if they are first sealed. Use a waterproof sealer (3 to 4 coats), or paint the item with fresh latex paint. Allow to dry completely. Mist the sealed with CoolSlip before impressing metal clay into the surface for a clean release.
We offer our own line of textures made just for use with metal clay and other soft clays. Choose from over 1,000 patterns and sizes!
Avoid Clogged Metal Clay Syringe Tips

The best way to avoid clogged syringe tips is by simply placing the tip of your syringe in a container of water when not in use.
Un-Clog Metal Clay Syringe Tips

Metal clay can dry in the end of a syringe tip and make it impossible to extrude the clay. To un-clog the tip, first try using a paper clip to push the clay out from the end. If this doesn't work, soak the tip in water for a couple of hours (we like to use the Multi-Purpose Artist Container or overnight and then push the clay out. Be sure to save the clay! It can be rehydrated and re-used.
Avoiding Surface Drag
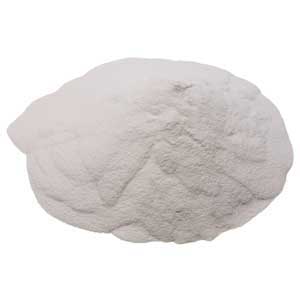
Kiln shelves can create surface drag on fine silver clay as it sinters. This surface drag can cause a piece that was perfectly round before firing to be out of round after firing, lose their shape, curl or pucker. To avoid this problem try flouring the kiln shelf with alumina hydrate. Sprinkle a little alumina hydrate powder on the surface of the kiln shelf. Use your finger to spread the powder evenly over the surface. It should be like a floured cake pan, a very thin coat. Now the metal clay can shrink without getting snagged on the kiln shelf surface.
Safely Fire Heat Sensitive Gemstones

Many gems are heat sensitive and can only be fired for a short time on an open kiln shelf or with a torch before they begin to discolor. To extend the firing time and temperature, bury the item in activated carbon. The carbon protects the stone (both manmade and natural) from oxygen. It's oxygen that damages the gem during firing. This works for fine silver, sterling silver, bronze and copper clays. See our Gemstone Firing Guide for a comprehensive list of gemstones that can and cannot be fired.
Work Harden Fine Silver

Fine silver is very soft and bends easily. If fine silver wire is used to make ear wires, case harden them by tumbling in a tumbler for at least an hour. This will stiffen them up greatly and hold their shape. It may seem like wires will get bent up in the tumbler, but they will not.
Remove Patina from Fine Silver

You can quickly burn off patina from fine silver by heating it with a torch. Gently heat the piece on both sides until the patina is gone. Another method is to re-fire the item in the kiln to at least 1200°F for 10 minutes. Silver can also be pickled in hot SilverPrep to remove the patina. Leave in the boiling solution until the item turns white and all traces of patina are gone. Polishing is always an option as well.
Using Mold Material

Mega Mold is a great way to take impressions of any object, and replicate it in metal clay.
Any 2-part silicone mold material has a shelf life of 2 to 6 months, including Cool Tools Mega Mold. Once the shelf life has been reached, the material will not want to set up. If you find that your mold material does not want to set up within the time noted on the instructions, it can often be forced to set with the addition of a little heat. Try warming it under a light bulb or on a cup warmer. Heating it to 100°F should set the material no matter how old it is.
Use Polymer Clay as an Armature

To make a custom armature for drying, form polymer clay into the shape you desire and bake it. Then drape the metal clay over the armature for drying. Allow to air dry or dry in a dehydrator. Do not dry on a cup warmer or other heater surface.
Jett Ballistic™ as a Holding Device

Un-cured polymer clay will permanently stain metal and unfired metal clay. Do not use un-cured polymer clay as a fixative to hold metal, unfired metal clay, or to hold stones in place during setting. Jett Ballistic™ works great for stone setting, riveting engraving and holding parts. Use it to make rigid molds, drying forms, handles and grips for your favorite tools, etc.
How to Dislodge Stuck Shot From an Opening

Avoid Work Hardening Bezels and Prongs

Tumbling work hardens metal, so items with bezels and prongs should be tumbled only after a stone is set, if possible. Fine silver or annealed sterling silver is used for bezels and prongs because the metal needs to be soft enough to move easily. If an item with a bezel or prongs is work hardened before setting the stone, the work will be much more difficult and the result not as lovely as if it was done when dead soft.
Silver Clay Firing Tips & Info
Tucked inside every package of silver metal clay is a neatly folded sheet with basic instructions for using the clay type at hand. Included in the instructions is a firing table that lists the various firing time and temperature combinations that the clay type can be fired at.
How do you know what combination to pick? The instructions don't really say.
Minimum vs Ideal
The variety of times and temperatures for each clay type makes it possible to co-fire embedded items along with the clay, and it also allows for a variety of firing methods. What the guides don't mention is that there is a trade-off in the strength of the final product when firing at anything less than the optimum schedule in a digitally controlled kiln.
A common misconception about silver metal clay is that after firing it is solid metal, just like a casting, but it is not. Castings are made by pouring molten metal into a mold and allowing the metal to cool in the mold. The result is a very strong, solid metal object with very little porosity (more air spaces). But silver clay is not at all like a casting. Silver clay is sintered, and sintered objects are very different.
The Sintering Process
Sintering is a process where tiny particles of metal are brought to a temperature just below their melting point, a point where the metal is able to bond to itself. Sintered objects are always porous because the metal particles are not like blocks that stack together neatly, they are various sizes and shapes, and they don't fit together perfectly.
When a sintered object breaks, the break is irregular and the inside appears to be grainy and is a lighter color than the outside. Silver clay objects have the same look when broken. Many mistake this typical breakage pattern for "under-fired" silver clay when what they are actually seeing is the telltale sign of sintered metal.
Time, Temperature & Strength
Sintering does not happen instantly, which is why it's called a process. It takes a while for the metal particles to form a strong bond. The longer silver clay is held at its sintering temperature, the more fully the individual particles are able to bond to each other. When fired at the lowest temperature for the shortest time, the bond that is created is not nearly as strong as when fired at the ideal temperature and time.
When to Lower the Temperature
Lower the temperature and shorten the firing time only when you have to. If you want to fire glass, heat-sensitive gemstones with silver clay, the temperature and time will need to be reduced for these items to survive. This is where the various firing schedules come in handy. Use the firing guides to find the clay that is compatible with the item you want to co-fire, and use the highest temperature and longest time you can within that range.
Teachers will often fire at less than ideal temperatures in a workshop or classroom situation because they have to budget their time to be sure your work gets in and out of the kiln and still leaves time to finish. When they have the luxury of time, however, they will fire at the optimum schedule. It's a good idea to re-fire at optimum anything that was quickly fired in a classroom as long as there are no heat-sensitive inclusions (glass and heat-sensitive stones).
When firing at less than the optimum schedule, be mindful of the trade-off. Avoid delicate tendrils and lacy details that are not supported. These can be easily broken during finishing, tumbling or in daily wear. Beef up ring shanks and bracelet links. Reinforce connections so you have a larger area of contact on components such as jump rings, bails, and pasted on elements. Remember that thicker pieces are less prone to breakage. Consider multiple firings if you need to include something that requires low firing, especially in the case of rings or bracelet parts.
Maximum Firing Temperature
The melting point of fine silver is 1761°F / 961°C. You may find slightly conflicting numbers, but the fact is, at this temperature, give or take a degree, fine silver will completely melt. Obviously, in order to transform our carefully crafted treasures into fine silver works of art, we need to avoid anything close to 1761°F / 961°C or our hard work will be just a forlorn memory.
At 1110°F / 599°C fine silver becomes "open" to fusing, but is cool enough to maintain its form. Up to 1650°F / 899°C fine silver will fuse and still hold its form, so this is why the range of temperatures for sintering all forms of silver metal clay is between 1110°F / 599°C and 1650°F / 899°C.
Digitally controlled kilns will sometimes creep up above their target temperature and a rise of a few degrees above or below your target temperature is nothing to worry about. Kilns usually go just a little over their target temperature, but will fall more than that. If your kiln overshoots your target temperature by more than 20 degrees, check the thermocouple to be sure it's functioning properly because temperatures just a few degrees above this will show the early stages of melting and will be detrimental to your silver clay objects.
Support
Remember that silver clay is just below its melting point when it's sintering. At sintering temperatures, silver clay is vulnerable to the forces of gravity because the binder has long since burned off and the particles are all by themselves with no support. Gravity will push against a silver clay structure as it's firing and slump it if it can. Give your pieces support with a firing media like alumina hydrate while they fire so they can't slump or deform.
To fire flat pieces, gravity will work in your favor, but sometimes you'll find that a piece that was fired flat ends up slightly lumpy and not flat after firing. This can result from "surface drag." Placing a flat piece of unfired, dried silver clay onto a firing shelf that has been sprinkled a thin layer of alumina hydrate will allow the clay to move as it shrinks during the firing process.
Puckering
When a stone or some other object is co-fired with the silver clay, the embedded object is not going to shrink, but the silver clay shrinks from all directions (length, width, thickness), pulling itself toward the center. If a small stone is embedded (3mm or less), it's not that noticeable. But larger stones will show strain around objects, depending on the size and how they were embedded. The clay will often begin to move upward as if trying to eject the embedded object. It is best to cut a small hole on the back of the piece to allow the clay to shrink around the stone.
Dimensional Objects
Anything that is domed, hollow, rounded, or has pieces that are hanging out in space, needs support during firing. A firing dish filled with vermiculite or alumina hydrate can be used to nestle pieces for support during firing. Vermiculite is a mineral used industrially as insulation, packing material, and even as a hydroponic growing medium, among many other uses. Vermiculite is not recommended with EZ960®. Alumina hydrate is a powdered ceramic material used in refractory products and glazes. Alumina hydrate has a very nice texture and provides superior support. Be careful when working with alumina hydrate that you do not kick up dust. Alumina hydrate can be an irritant to the lungs.
Another good support is fiber blanket. You can use tufts of the fiber blanket like cotton and make custom supports for cantilevered items or pieces that need some support during firing, but do not lend themselves to being buried in vermiculite. Fiber blankets are made of spun ceramic fibers and the airborne fibers should be avoided as they can irritate your lungs if inhaled. Fiber blankets are not recommended for use with EZ960 Sterling.
Look at your piece and decide the best way to fire it to avoid flat spots, deformation, etc. A ring should be placed onto a ring pellet of the desired size, placed in a firing dish filled with alumina hydrate and fired at the appropriate temperature. Round objects need to be placed on a fiber blanket or nestled into a dish of vermiculite or alumina hydrate. Place dimensional objects so that gravity will work for you rather than against you. Domes should be placed face down during firing. Lentils can be placed sideways. Be careful when "nestling" the unfired pieces into vermiculite to avoid scratching the soft clay surface.
Re-Firing
Anything made of fine silver can go into the kiln more than once. Follow the original process and fire according to package directions. Keep in mind that you don't have to fire silver clay just once. Fire as many times as you need to accommodate low-fire inclusions, to add on to previously fired pieces, make repairs, or add findings. Re-firing does not hurt fine silver.
If the piece you wish to re-fire was supported in a firing dish with vermiculite, alumina hydrate or on a fiber blanket, you'll have to support it the same way re-firing.
Adding Unfired Silver Clay to Fired Silver Clay
To successfully add new clay to pre-fired silver clay, the new clay needs to get a grip on the old in some way. If you know you will add to a piece as you are making it, you can prepare the area in advance to get the strongest connection. Score grooves or lines in the wet clay or scratch into the dried clay where you know you'll add on. Once the main piece has been fired, the grooves will give the new clay a hand-hold and make the connection much more reliable after firing.
Repairing Broken Areas
Most pieces that fail break because they were not fired at optimum and/or the piece was too thin or delicate for the application. Often times the repair that is needed is a butt joint. A butt joint is where 2 pieces butt up together, head to head, but don't overlap. This is usually a very small area of contact that can be easily re-broken if the rest of the piece is too weak to support the structure. Repaired joints are not as strong as a virgin piece of silver clay, so you may want to add additional thickness to the piece as well as repairing the joint.
Consider the durability of the design compared to how it's used. If your piece is a ring, maybe it's just too thin to survive the trials and tribulations of a ring. You may be better off making a new shank out of fresh silver clay and adding the broken pieces of your original ring to the design and create something new and really cool. This is one of the ways you'll learn what's possible and not possible with this medium.
Where you do want to make a repair, it's best to use oil paste for the strongest bond, and if you can, add clay to the area to support it. If a bail breaks off, adding a tab of clay to the back to bridge the broken pieces is better than trying to make a bond with just a little paste added to the break.
Co-Firing Glass
Whether you want to fuse your own glass cabs or co-fire pre-made glass, co-firing in silver clay is very easy.
There are many types of glass, and each brand and type has a different COE (coefficient of expansion), which is the rate at which it expands and contracts as it's heated and cooled. The most common glass used for fused cabs has a COE of 90. We'll focus on firing with this type of glass however, just about any glass can be successfully fired in silver clay.
Co-firing glass and silver clay presents a few technical issues that you should know about. Glass will stick to an untreated ceramic kiln shelf, so you'll need to prepare your shelf with kiln wash, or protect it with ceramic fiber paper. The ceramic fiber paper is easier to use, but should be pre-fired to burn out the binders before use. Fire to 1400°F / 760°C before use. There is no need to hold the temperature, just heat to 1400°F / 760°C and turn the kiln off. Handle with care after firing as the paper will be fragile.
Another issue with glass and silver clay is fuming. As silver clay fires, silver fumes can build up in the kiln and cause a smokey-metallic discoloration called fuming. This is simple to avoid by venting the kiln. When co-firing glass and silver, remove the ceramic plug from the top of your kiln, or use the vent prop on the kiln lid to allow the silver fumes to escape as the piece is fired.
Glass must be annealed after heating. Annealing is a slow cooling process that allows the glass to return to room temperature without cracking. Heating creates stresses in the glass that must be relieved as it cools, and this process is called annealing. If glass is not properly annealed, it will crack or shatter. If a piece is improperly annealed (cooled too quickly), it might break.
Make sure glass pieces are clean before firing. Every speck of silver clay dust left on the glass will fuse to the surface when it's fired. If this is not part of the plan, be sure to clean the surface with alcohol before firing. Use a pointed cotton swab dipped in alcohol to remove silver bits from the surface and edges where the silver clay and glass meet. Don't use water on your swab to pick up the silver dust. Water will soften the clay.
Never quench any piece with embedded glass.
Creating a Setting
Glass cabochons are easy to fire in place. Most of the glass cabs available are COE 90. Whatever your design, you'll need to make sure the glass is trapped in place so it cannot fall out of its setting after firing. One option it to make a "seat" for the stone by placing it on the wet clay and tracing around it with a needle tool, then removing the excess clay below the cab and setting the cab in the resulting hole. When cutting out around the cab, hold the needle tool straight up and down so you have a little extra space around it to account for shrinkage of the clay. By giving a little extra space, you'll relieve the stress that can break the glass or tear the silver clay as it shrinks.
Depending on the size of the cab and the thickness of the clay, this may be all that is needed. However, if your cab is large, or to add visual interest, you might want to add a rope of clay or syringe around the stone to form a "bezel" or set the stone in a bezel made from bezel wire or silver clay.
Co-Firing Schedules
Most COE 90 glass is fused at temperatures around 1480° - 1550°F / 804° - 843°C. At this temperature range, the glass is molten and will slump, rounding the edges. To preserve the shape of a cabochon, stay below the fusing temperature.
COE 90 Firing Chart
| Technique | Schedule | When to use |
| Tack Fuse |
1200°F - 1350°F 649°C - 732°C soak for 30 minutes |
To co-fire in silver clay with no change to glass |
| Full Fuse |
1400°F - 1500°F 760°C - 815°C soak for 30 minutes |
To fuse glass and silver clay together |
| Fire Polish |
1100°F - 1200°F 593°C - 648°C soak for 5 minutes |
To make cut or ground glass edges shiny, without changing shape |
| Crack Repair |
1400°F - 1500°F 760°C - 815°C soak for 30 minutes |
To repair a cracked piece of glass |
| Bubble Repair |
1200°F to 1250°F 649°C - 676°C soak for 30 minutes |
To squeeze out bubbles from glass |
Annealing Glass
Crash-Cool Annealing
No-Peak Annealing
Co-Firing Dichroic Glass
If your glass develops a crack, re-fire it at 1450°F / 787°C for 30 minutes to allow the glass to fuse. Then anneal.
Co-Firing Lamp worked Glass
Lamp worked glass pieces can be fired in place with silver clay. It's best to keep the temperature low since Lamp workers often use a COE 33 glass.